


How to Mint your Member Badge NFT
August 25, 2022

Remember that feeling you got when you used FaceTime for the first time or your parents finally started texting you back instead of calling? It’s kind of magical, and after a little while, it will start to seem really simple and straightforward.
There are four main things you need to do to be able to mint your Early Majority Member Badge NFT.
- Set up your Wallet
- Add Ethereum to your Wallet
- Practice using your Wallet
- Mint your NFT
Let’s go through each one in detail, and then we’ll cover some frequently asked questions.
The first step to getting started with Web3 is to get your own crypto wallet. Your wallet is essentially your web3 credit card and your login credentials all rolled into one. We are using the Ethereum blockchain, and so you’ll need to create an Ethereum wallet to get started.
There are different types of Ethereum wallets out there, but the most popular one by far is called “MetaMask”. We’ll share the process for getting set up with a MetaMask wallet, but the process is very similar with a Coinbase Wallet or Rainbow Wallet.
A couple of things to note before we get started. In this brave new web3 world, most of what we’ll do will happen on the desktop. You’ll also see that most wallets aren’t supported with Safari, but require a browser like Chrome or Firefox. There are mobile versions of most of these tools, but quite frankly, doing web3 stuff on mobile can be a little bit challenging. But it’s starting to catch up and this will probably get dramatically easier on mobile over the next 12 months.
When you create a wallet, you’ll end up with a ‘Wallet Address’ - a 42 character string of numbers and letters that start with the “0x”. This is a public address, kind of like your email address - anyone can send something to it, but you need a private key to actually send crypto or buy an NFT (more on that later).
To get started, head over to Metamask.io, download the extension for Google Chrome, and follow the prompted steps to complete your wallet setup. We created this guide to help walk you through the process!
The most important thing to remember is that your Seed Phrase is EVERYTHING. Your wallet actually lives on the blockchain - not within the Metamask application. Metamask is simply a viewer into your wallet. As you get more advanced or as the web3 space progresses - you can actually use any wallet app to interact with your wallet address, maybe even one that hasn’t been created yet! Your wallet address “0x…” paired with your Seed Phrase is the key.
A few tips:
- NEVER SHARE YOUR SEED PHRASE WITH ANYONE
- No one should ever need to know it, unless they are trying to take something from it!
- Write it down on paper, and then store that paper somewhere safe or better yet, store it in a secure password manager. Make multiple copies of it and store them in different places in case of emergency.
- Don’t store your Seed Phrase on a cloud connected service (i.e. iCloud, Dropbox, etc)
- Once you’re set up with a wallet app - you won’t really need your seed phrase. It’s not something you’re going to have to pull out and use on a regular basis - your Metamask password is what you’ll need more often.
Now that your wallet is set up, you’ll need to add some Ethereum to mint NFTs. Even if you’re minting a free NFT, you still need a little bit of Ethereum to pay the transaction fee (aka ‘gas fee’), because the wallet requesting the mint is required to send the transaction fee.
For the Early Majority Member Badge NFT mint, you should expect this gas fee to be 0.005Ξ or less (~$5), but we recommend adding at least 0.01Ξ to your wallet just to be safe. Some exchanges also have a minimum purchase amount, so keep that in consideration as well.
The simplest way to buy Ethereum is through the ‘Buy’ function in Metamask, and then select a provider that works in your country. We’ll walk through the process using MoonPay, because the crypto you purchase using MoonPay will show up automatically in your Metamask wallet.
From the main Metamask tab, click the ‘Buy’ button, scroll down and select MoonPay, and begin following the prompts to complete your purchase.
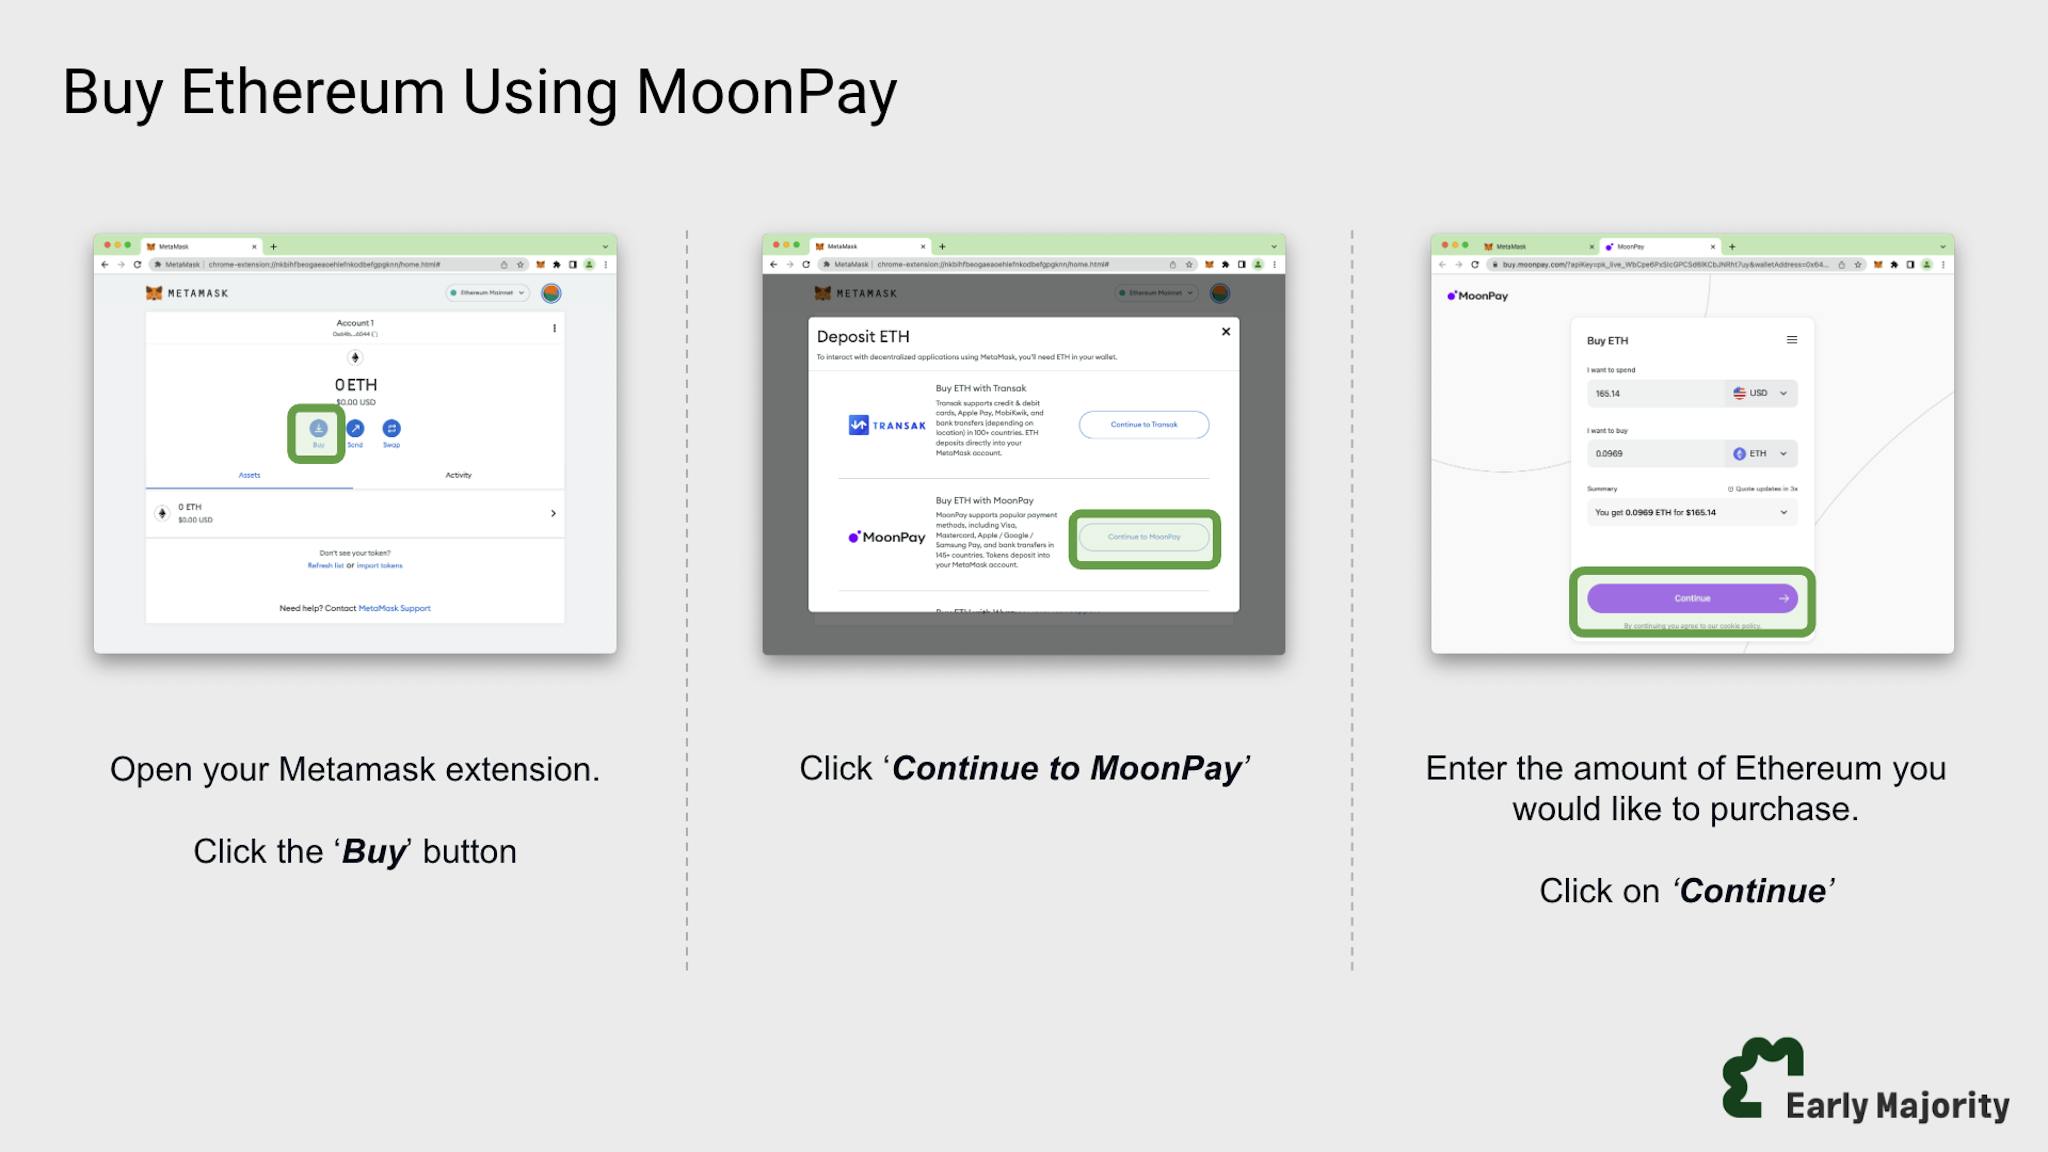
One thing to know is that depending on where you live, you will likely need to verify your identity with the exchange using a government issued ID like a Passport or a Driver’s License to purchase cryptocurrency. This is a process that you only need to go through once to purchase any type of cryptocurrency with that exchange, because it is required by your local government. It is also important to note that some exchanges require a waiting period of up to 8 days for you to be able to spend or transfer a new crypto purchase, so make sure you plan ahead if you want to mint and you’re buying Ethereum for the first time.
Now that you have a Metamask wallet set up with some Ethereum inside, it’s time to learn the ins and outs of connecting to web3-enabled websites with your wallet and signing transactions. Your wallet will function as a way to both log in to websites as well as purchase digital goods, and so you can think of your wallet as your username, password and credit card all rolled into one.
One thing to try is to log on to a web3-enabled site. OpenSea.io is the largest NFT marketplace, and so it’s a good place to familiarize yourself with and a safe place to try logging in for the first time.
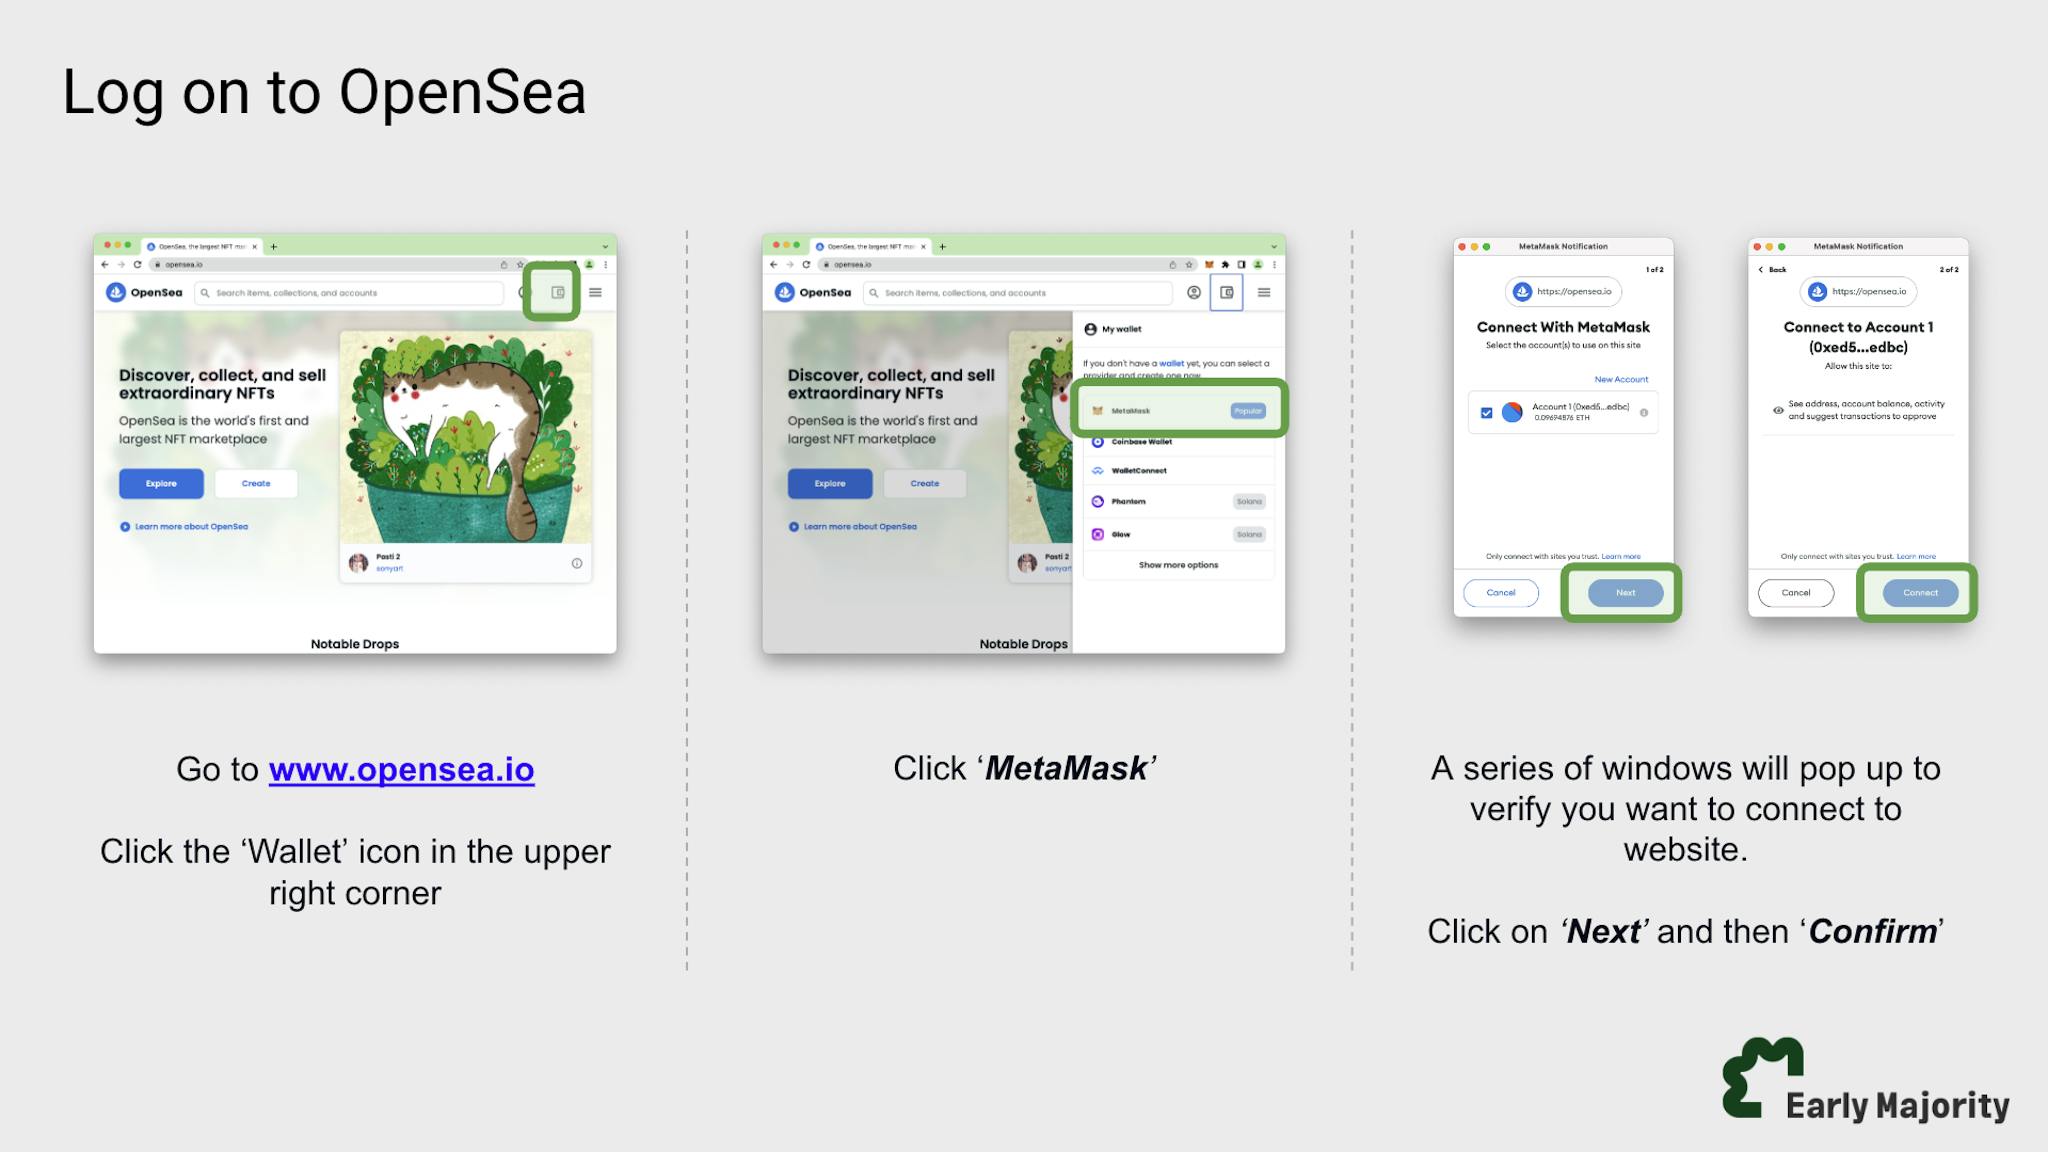
It’s important to note that from time to time, web3-enabled sites will ask you to ‘sign’ a message to grant access or make a transaction. It’s critical that you read the message before signing to make sure that you’re ok with the information or access the website is requesting is ok. Admittedly, this can be difficult as some messages are not very readable, but this is improving rapidly and will become more and more user-friendly over time.
A few tips:
- Only connect your wallet to sites that you trust
- Always verify that the site you are looking for is linked from an official source, like an official twitter account. It’s not a good idea to click a link from a google search and connect your wallet, because sometimes bad actors create fake sites designed to trick people into connecting their wallets.
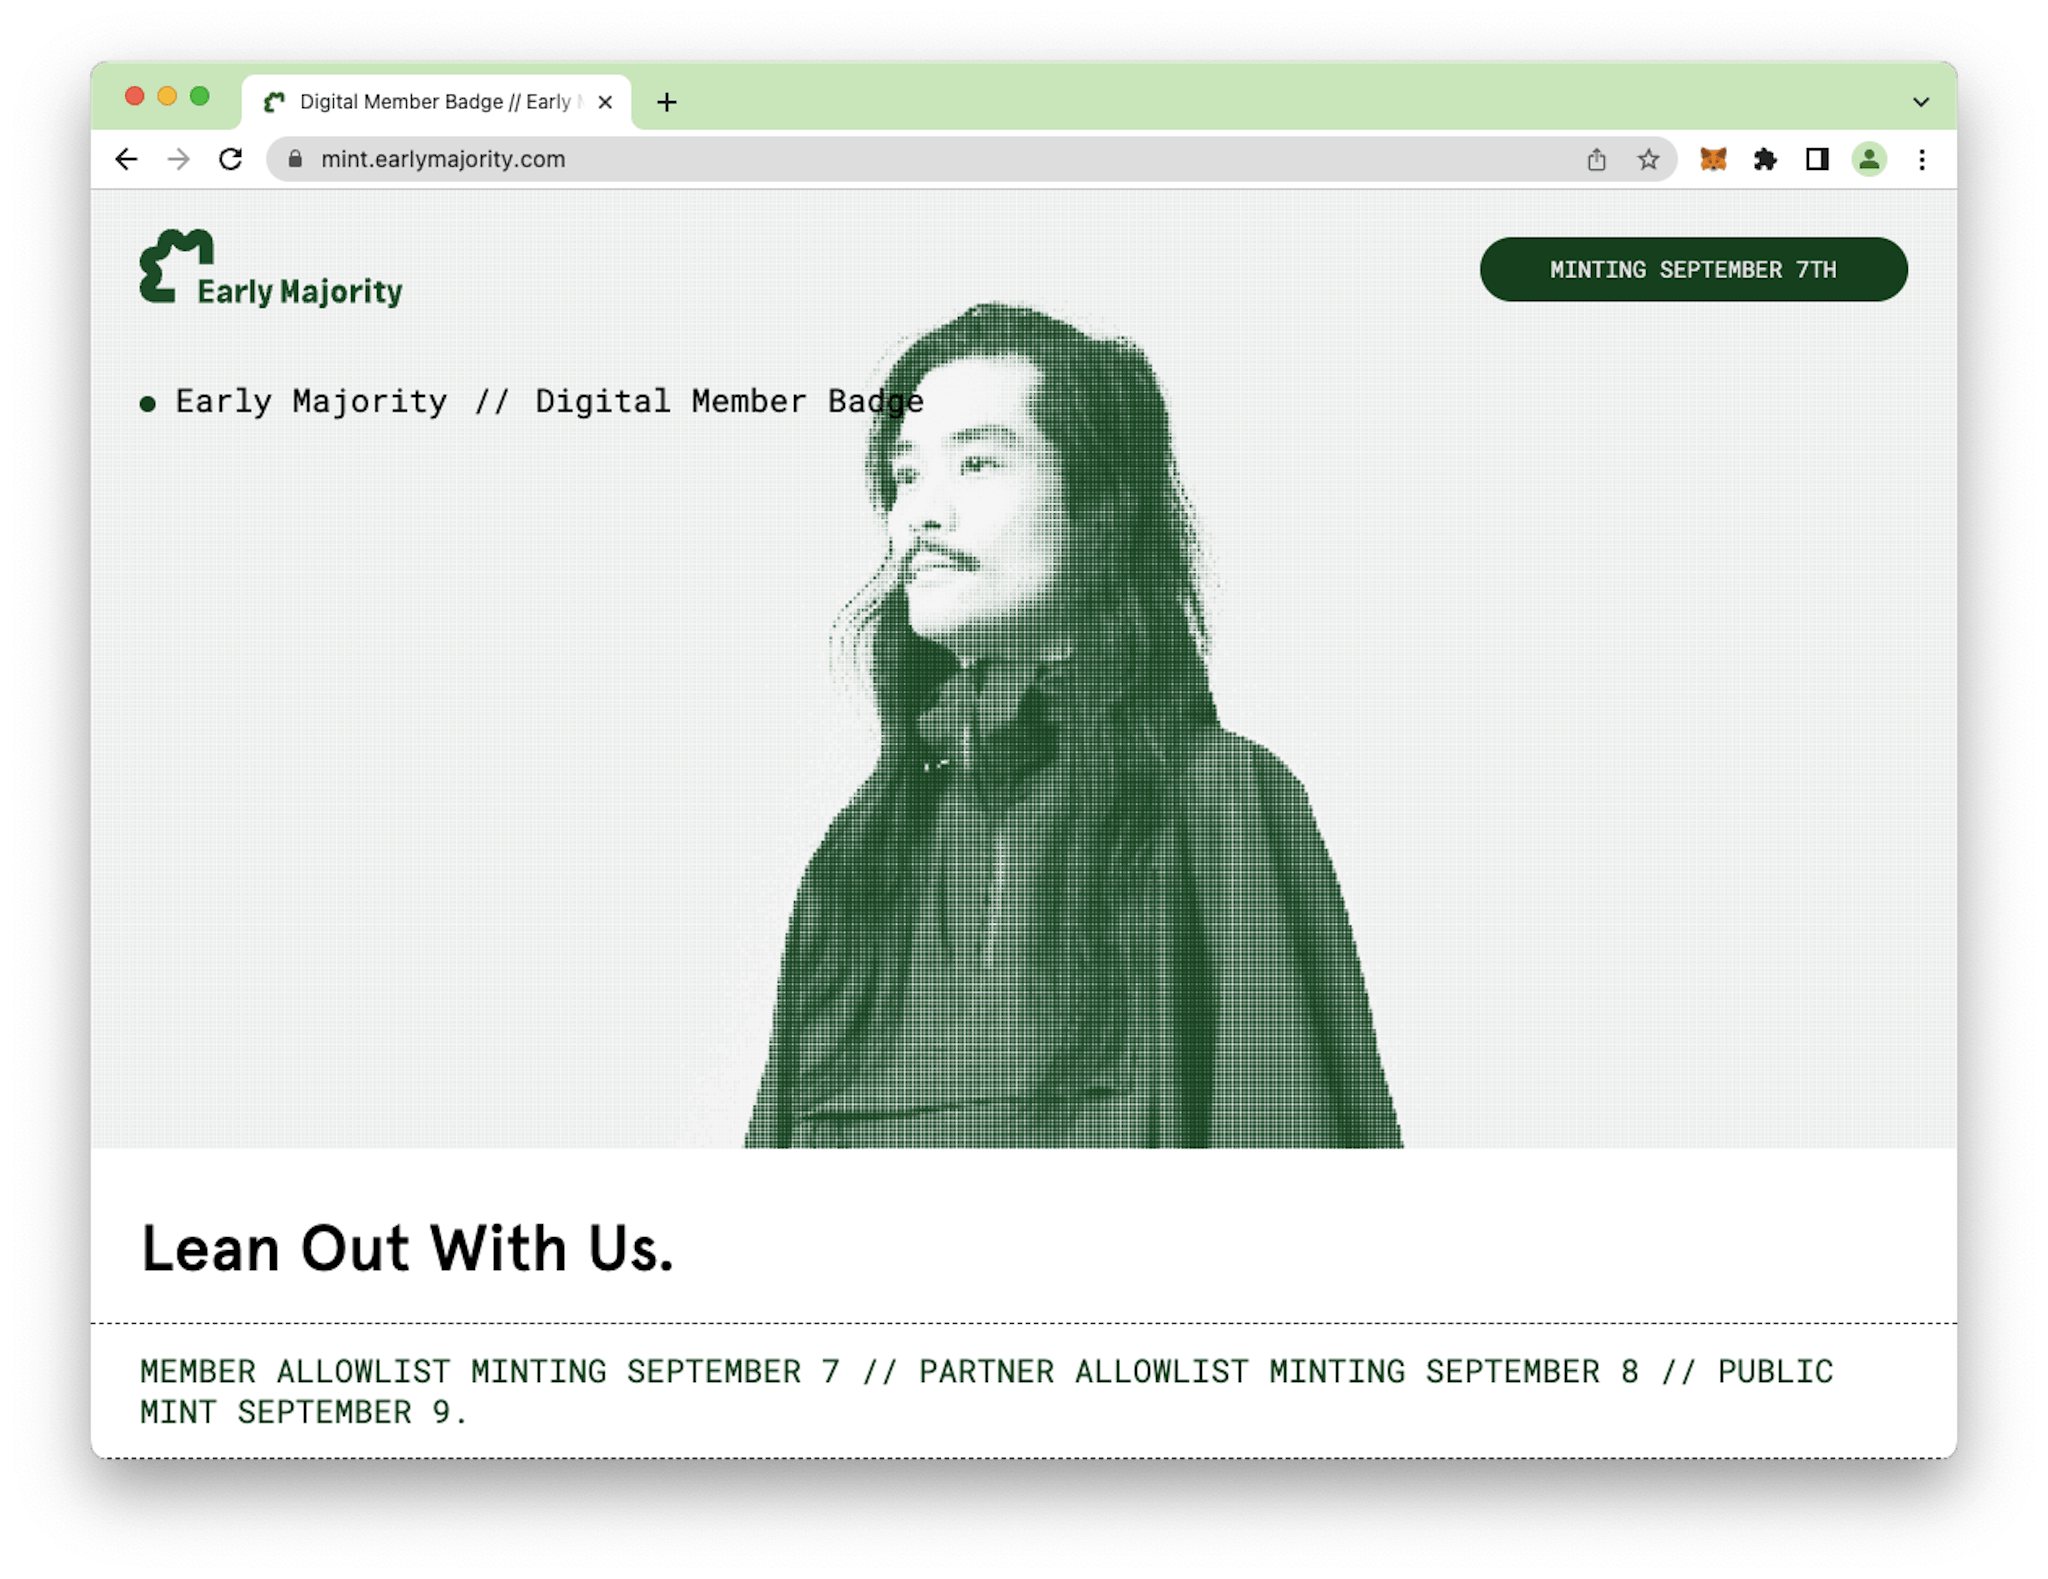
Now you’re ready to connect your wallet to mint your Early Majority Member Badge NFT!
Go to mint.earlymajority.com, and look for the ‘Connect your Wallet’ button in the top right corner once minting is live.
Next, you’ll connect your wallet to the mint site by approving the connection in MetaMask.
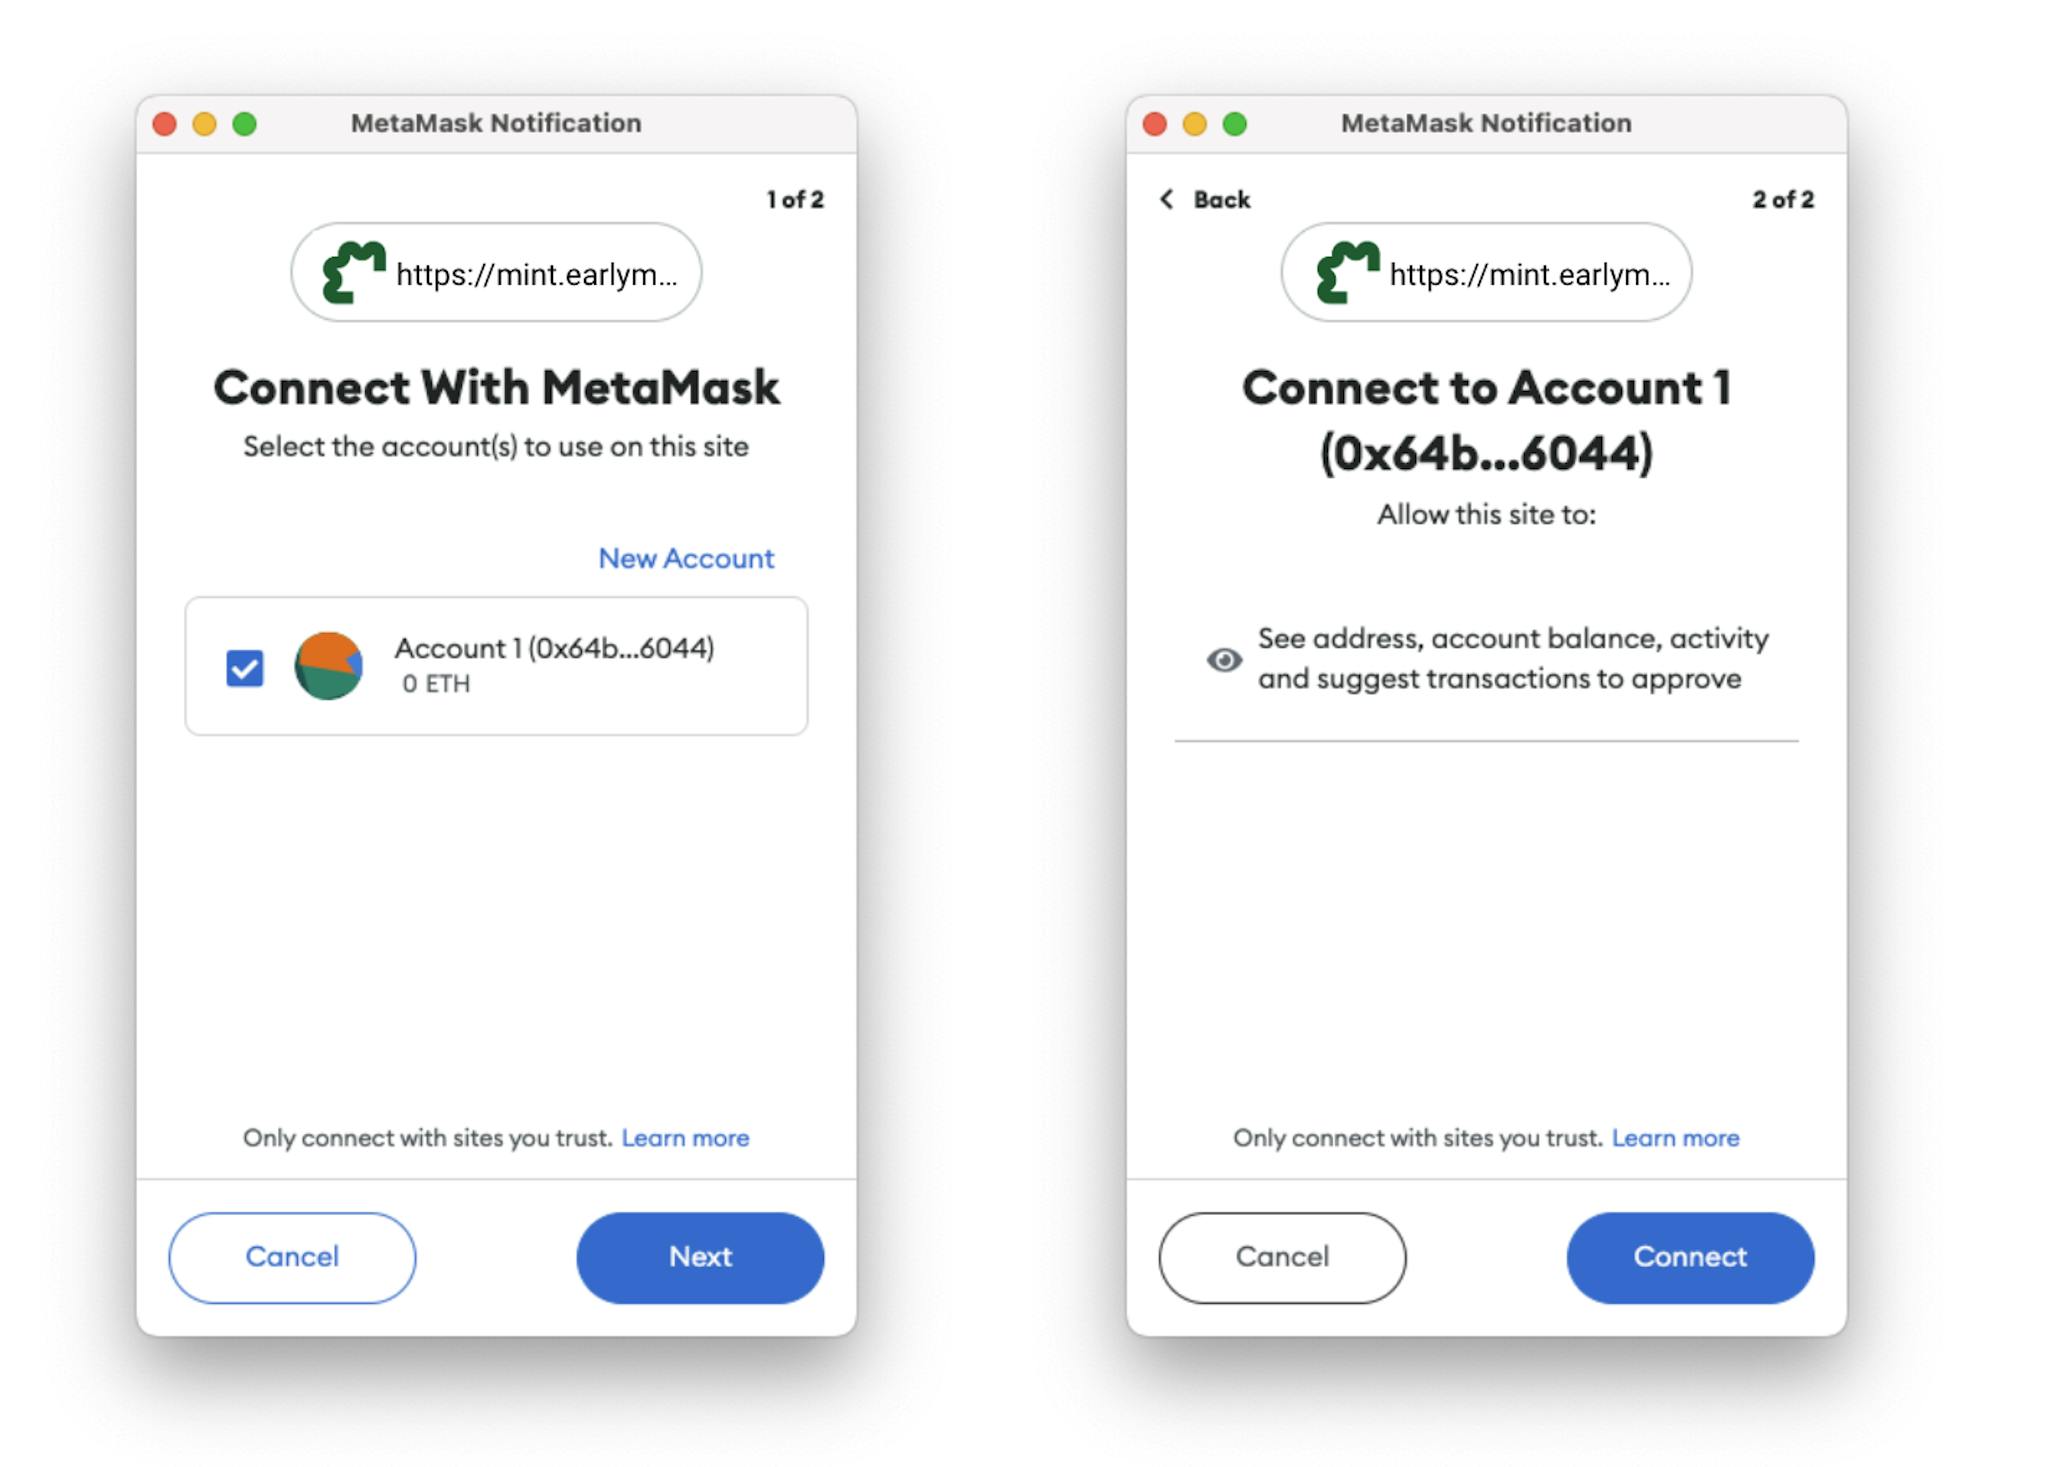
After your wallet is connected, you can click the Mint button. MetaMask will confirm the final cost of the transaction including the gas fee, and ask you to approve the transaction by signing it. Once you complete that step, the transaction is submitted to the blockchain and the NFT is minted and placed directly in your wallet. You’re done!
Note: If the gas fee seems abnormally high, that generally means there is a ton of activity currently happening on the ethereum blockchain. Each minting phase for the Early Majority Member Badge NFT mint is at least 24 hours, so feel free to wait until the gas fee seems reasonable (around 0.005Ξ).
One strange thing to note is that the MetaMask desktop extension does not actually show your NFTs (even though the mobile MetaMask app does!). You’ll be able to see immediately that your Ethereum balance has changed, but the best way to confirm that you’ve actually minted your NFT is to log into OpenSea with your wallet, where you will be able to see your new NFT on your profile.
Now that you have your Member Badge NFT in your wallet, you’ll be able to use your wallet to log in to the Early Majority website to receive members-only pricing and access to our online journal - ‘Tools for Leaning Out’. You’ll also be able to access our members-only discord channels, and join us as we make your Limited Edition Bum Bag!
What is a Blockchain?
The Blockchain is a huge database shared by millions of computers and which allows people/individuals to transfer different digital assets such as NFTs, Tokens (bitcoin, ether) in a decentralized way. When you interact with the blockchain, there are no middlemen involved - every transaction you make is recorded directly on a public ledger without the intervention of a third party.
What is an NFT?
An NFT (‘Non-Fungible Token’) is a digital certificate of authenticity that is attached to a photo, video, or work of art. It is stored immutably on the blockchain, making it more efficient than a paper certificate of authenticity. Each NFT has unique properties reflected in their digital contract, and each NFT has a unique Token ID.
Why would someone buy an NFT?
NFTs have many different types of uses, from collecting digital art or fan memorabilia, to membership passes for different types of communities. Some people buy and sell NFTs to try to make money, and other people buy NFTs to join communities that interest them. At Early Majority, we’re using our Member Badge NFTs to provide members-only access to our website and provide special perks for holders!
Where can I buy and sell NFTs?
The most popular marketplace today for buying and selling NFTs is called OpenSea. But there are others that are gaining popularity, and more and more marketplaces are launching all the time. LooksRare is a community owned marketplace that shares fees with users, and Magic Eden is another marketplace that recently expanded from Solana NFTs into Ethereum NFTs. There are even some very cool NFT market places more focused on fine art or music NFTs, like Foundation, Royal, Sound.xyz and Nifty Gateway. Even Game Stop opened an NFT marketplace this year!
Can you use your wallet on Mobile?
Yes. MetaMask has a mobile app that you can use to setup a new wallet, or you can import an existing wallet into the app with your Seed Phrase. Coinbase and Rainbow also make mobile wallet products that we like. The challenge with mobile is that it can be difficult to login to web3-enabled websites on your mobile phone.
Once you get the hang of logging into websites using your desktop, it’s fun to try on your mobile device too. The Metamask App has a built-in web browser that is usually the best way to navigate web3 sites on mobile, but it can be a little bit buggy for everyday use. So it can be a bit of a hassle to find a website on Chrome or Safari, copy the address, open your MetaMask mobile browser and paste it in. This is more of an advanced maneuver.
One benefit of using mobile apps though is that it’s generally easier to buy crypto through MetaMask mobile. Many providers accept Apple Pay or Google Pay, and that can make the process simpler than managing it on the desktop.
What are some good resources on Blockchain and NFTs?
The Non-Fungible Token Bible: Everything you need to know about NFTs
Going Bankless: The Ultimate Guide
The Boys Club and BFF communities focus on helping women and non-binary people learn about web3, and their resources are completely awesome.